…take pictures of water drop collisions?
If you are interested in learning a bit about how I take these pictures, or if you are planning to get started yourself, this page is for you!
However, a warning might be in place here before you start reading. Don't expect a step-by-step tutorial of how to get the most complex shapes. It would take away all the fun of trying out things for yourself! Instead, I will be discussing some basics that will help you to get started.
Everything you read here is based on my own experience and knowledge, and I do not claim that it is complete, or the only or best way to do things. Often, there are several ways to achieve your goals, and only by using your own creativity will you be able to create truly astonishing drop sculptures.
Nonetheless, if you have any questions, don't hesitate to contact me using the Contact form provided in this web page.
I am planning to assemble some additional information with some pictures to illustrate it as soon as I find the time to do so. If you are interested, please visit again or write me an email using the contact form. I will then inform you as soon as the information is online.
But now, let's start…
Camera and Lenses
Contrary to what you may think, the camera is not the most important part of your equipment in water drop photography. Theoretically, any camera where you can adjust the aperture and exposure time manually will do. The moment is frozen by using a flashlight (see below), and the shortest shutter speed of your camera is of no interest at all.
Since the water sculptures are usually fairly small, you will be working in the macro range of your lenses. This means that the depth of field is rather small, depending on the reproduction ratio (and some other factors) you are using. Therefore, I usually use an aperture f/16, but I sometimes go up to f/22. (Note that for large f-numbers, diffraction blur can become an issue.) With this aperture, and a (relatively) dark room, you can open the shutter for about 0.5s.
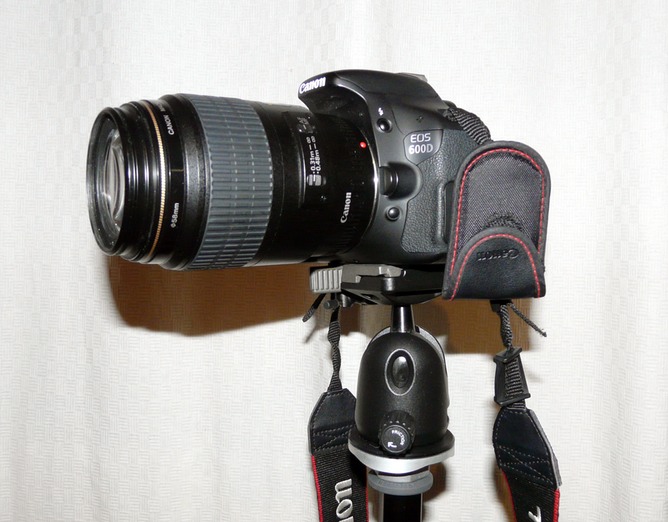
You will get the best image quality using a macro lens. I am using the Canon 100mm 1:2.8 USM Macro Lens on a Canon EOS 600D camera, and I am quite happy with both. However, a good macro lens isn't cheap, so if you want to try out things first before buying one, I recommend using a zoom lens with a close-up lens. Alternatively, you can also use extension tubes.
One word of caution: you should maintain a distance of about 50cm or more from the point of impact, to avoid getting droplets of water on your lens and camera. Therefore, I prefer the 100mm macro lens over the 60mm macro lens, since it let's me keep a larger distance! The same applies to the use of close-up lenses or extension tubes: look for a combination with your lens of choice that let's you maintain a good distance. You can find an explanation of how extension tubes and close-up lenses work -- and how the magnification factors can be calculated -- here.
Flashlights
Having the right flashlight is very important in water drop photography, since it is the flash that freezes the moment, and not the shutter! To get sharp images without motion blur, you should use a flash duration of less than 1/10,000s. To achieve this, you need to manually reduce the flash power to about 1/32 or 1/64 of the maximum power. This of course means that the flash allows you to set the power manually. Check this before buying one for the purpose of water drop photography!
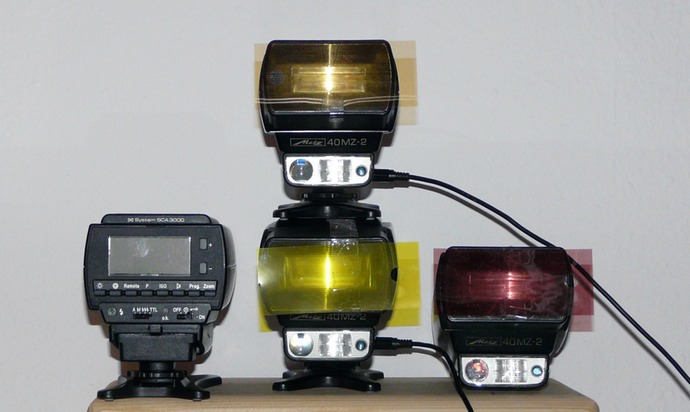
If you already have a flashlight, look at the manual to find out what flash durations corresponds to the reduced power settings. For my first attempts at water drop photography in 1994, I bought a Metz Mecablitz 40MZ-2, which served my purposes well at that time. Even today, I am still using this flash.
When getting a new flash, you should keep in mind that you might need 3-4 flashlights to achieve a good lighting of some scenes, although many good shot can also be achieved with 1 or 2 flashlights. So the price of the flashlight can become quite an issue. I simply got 3 additional Metz 40MZ-2 in online auctions, where it is usually sold at a very reasonable price (since it is already a little bit outdated). And I am very happy with these flashlights… An alternative could be the Yongnuo YN-560, which is also fairly inexpensive and seems to be working very well for waterdrop photography. However, I do not have any experience with it, so I cannot really tell you if it's OK or not.
Also, it is important that you use identical flashlights, since with flash durations of less than 1/10,000s, even a small difference in the delay between electric impulse and flash trigger can lead to double exposure, which is something you definitely want to avoid!
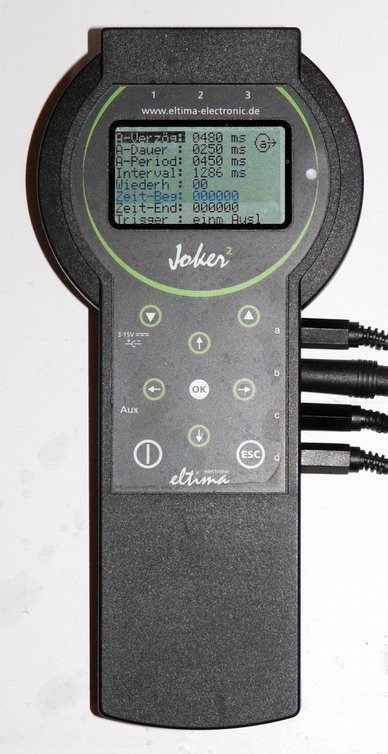
Micro Controller
When I first started water drop photography in 1994, I got a cheap light barrier with a adjustable delay to fire my flashlight a determined amount of time after the drop passed through the light barrier. This works fine and leads to quite repeatable shots, but is sensitive to the drop size and not necessary when using a micro controller.
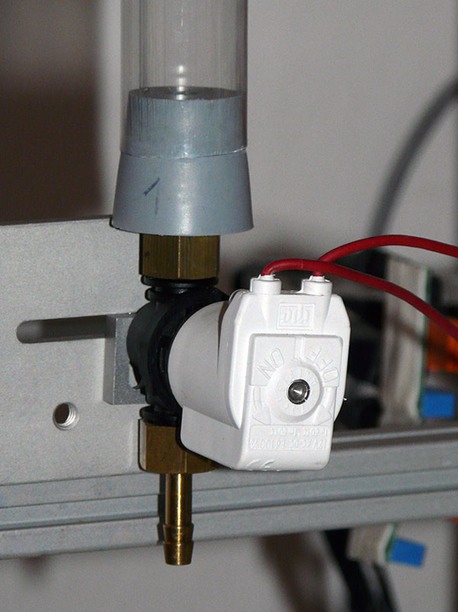
Depending on how deep you want to get into the subject and what type of sculptures you want to achieve, a micro controller quickly becomes indispensable. I use it for three purposes: to trigger the flash lights, to open the shutter of the camera, and to control the delay and opening duration of the valves that create the drops.
Especially when working with several valves, the number of outputs of your micro controller can become a limiting factor. I am using 3 valves, so with the flash trigger, I need 5 different output connectors. As a micro controller, I am using the Joker2, with which I am quite happy. Unfortunately, it currently has only 4 outputs, so I need to activate the camera manually when I am working with all three valves. This is not really a problem with an exposure time of 0.5s, but a bit of a hassle… But the developer just told me that soon the number of outputs will be doubled with a software update (so that I don't need to buy a new controller, just some Y connectors to increase the number of outputs). I am already looking forward to being able to carry out some ideas for which I need more than 4 outputs...
Alternatively, the GlimpseCatcher seems to be a very good choice, and also the StopShot is being used by other water drop photographers, but here again, I cannot tell you more since I have no experience with the devices. If you like electronics, you might want to build yourself your own controller on an Arduino basis.
Drop Creation
In my first life as a drop photographer (in 1994, many eons past), I used a coffee filter which had a lever that allowed me to manually let a single drop out. But since I couldn't control the size and frequency of the falling drops, I was quite limited in the shapes I could achieve in this way.
When starting again, I realised that much better control could be exercised over drop size, number and frequency by using a micro controller activated magnetic valve. As a water tank, I use a Mariotte's bottle, which allows you to keep the pressure constant. While one might argue that a changing pressure makes life interesting in that it leads to continuously changing sculptures (and I don't argue against it, actually I myself use this effect sometimes), I often have the need for a constant pressure over a large number of shots. An example are my multiplex structures, where it often takes a many test shots and very fine adjustments to get the timing right, and here a changing water pressure would lead to continuously changing parameters and drive you mad…
An inexpensive way to start your water drop photography can be to get an infusion set, where you can easily adjust the frequency of the falling drops. While this of course strongly limits the complexity of the resulting structures, it can nonetheless be used to even create drop-on-drop sculptures.
By the way, drop height is not a very important issue. You should be fine with 30-50 cm, but if the drops fall from too high, you will get more of the little annoying droplets flying around.
Basin
As a basin, you can use many different items from your kitchen. Experiment with different colors (especially black and white) to see the effect it has on the pictures! The size is not very important, and a basin water depth of about 2-3cm is sufficient.
If you want to get pictures with reflection, however, you need a relatively large basin, since the camera angle should be as shallow as possible, in order that the reflected structure is not disturbed by the crater and expanding waves. I have built my own basin using sheets of acrylic glass; semi-transparent, so that I can also use a flash from below. A length of 80-100cm is usually sufficient, but: the longer, the better...
Additional gear
In order to get great water drop pictures, you will also need some additional gear:
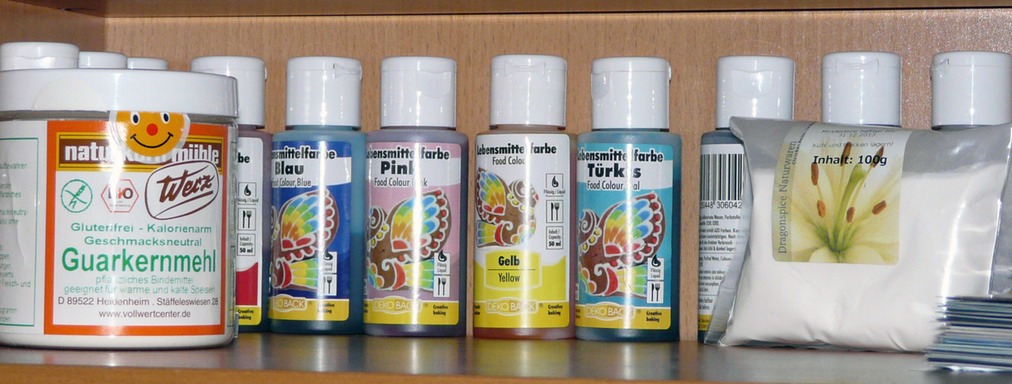
- colours: I use food colouring in my drop water to achieve the colourful structures you see on these pages. For the crowns, I sometimes use food colouring, but also acrylic paint, especially when working with cream.
- water viscosity: Increasing the viscosity of the water is necessary to get more "quiet" structures. I usually use either guar gum or Xanthan. Both have different effects on the resulting structures, and of course also the mixing ratio has an influence. A 1/4 table spoon per litre of water might get you started, but you will have to experiment for yourself. There is no "right" quantity (but you shouldn't use too much), just find out what amount works best for you. (I told you it's all about experimenting for yourself!)
- acrylic plates: I use acrylic plates with about 50% transmissivity as diffusors for the flash lights. As with nearly all kinds of photography, the results in water drop photography are strongly dependent on the lighting you use. Again: experiment!
- focusing aid: To help you focus your camera, place any object on the point of impact of the drops on the water surface.
An Inexpensive Way To Start...
If you are not sure whether drop photography will keep you fascinated for a longer period and warrants the (possbile) expenses, I would recommend starting with an infusion set, one good flash light, a close-up lens, and possibly a light barrier. With some patience, you should be able to achieve some nice sculptures in this way.
Last Words
The information given above should enable you to get a good start as a water drop photographer! I would be happy to get some feedback from you as to the usefulness of the information and suggestions for improvement. Please write to me using the Contact form.
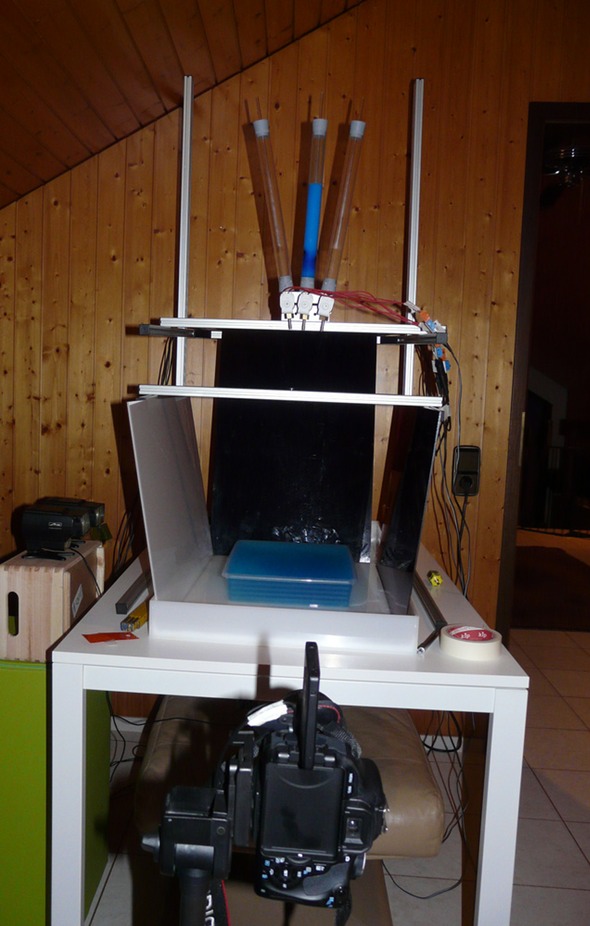
My Setup
Well, there is not ONE setup, and I rearrange things all the time to get different effects. The setup you see in this picture was used in my "Deep Sea" series with glowing blue sculptures. For instance, "Glowing Deep Sea Creature".